Botones en Flutter
Diseño e implementación de uno o varios botones widgets RaisedButton en Flutter, además veremos la forma de agregar estilos como color, tamaño de letra
Veremos ¿Cómo programar un botón en Flutter?
Bien, para empezar antes debemos tener instalado Flutter 3.0, para este ejemplo estamos usando el IDE Android Studio. Lo que haremos es crear un nuevo proyecto Flutter en Android Studio previamente instalado el SDK de Flutter, luego procedemos a borrar practicamente todo el código que por default nos trae el SDK de Flutter al momento de crear el Proyecto.
Contenido
- Botones en Flutter
- TextButton
- ElevatedButton
- OutlinedButton
- IconButton
- Botones personalizados: Un ejemplo práctico de menu de opciones en Flutter
- Paso 1: Creamos el proyecto y lo configuramos
- Paso 2: Agregamos SingleChildScrollView()
- Paso 3: Agregamos Column()
- Paso 4: Agregando Row() para dos botones
- Paso 5: Programamos un widget personalizado _boton(nombre,acronimo)
- Paso 6: Testing
Botones en Flutter
Los botones que Flutter nos proporciona son :TextButton, ElevatedButton, OutlinedButton e IconButton; los cuales los podemos usar en nuestros proyectos y además nos permiten dar interacciones al usuario con el aplicativo.
Cómo programar un boton con TextButton
TextButton(
  onPressed: () {
    print("Button pressed");
  },
  child: Text("TEXT BUTTON"),
)
Cómo programar un botón con OutlinedButton
OutlinedButton(
  onPressed: () {
    print("Button pressed");
  },
  child: Text("TEXT BUTTON"),
)
Cómo programar un botón con ElevatedButton
ElevatedButton(
  onPressed: () {
    print("Button pressed");
  },
  child: Text("TEXT BUTTON"),
)
Cómo programar un botón con IconButton
IconButton(
  icon: Icon(Icons.volume_up),
  onPressed: () {
    print("Button pressed");
  },
)
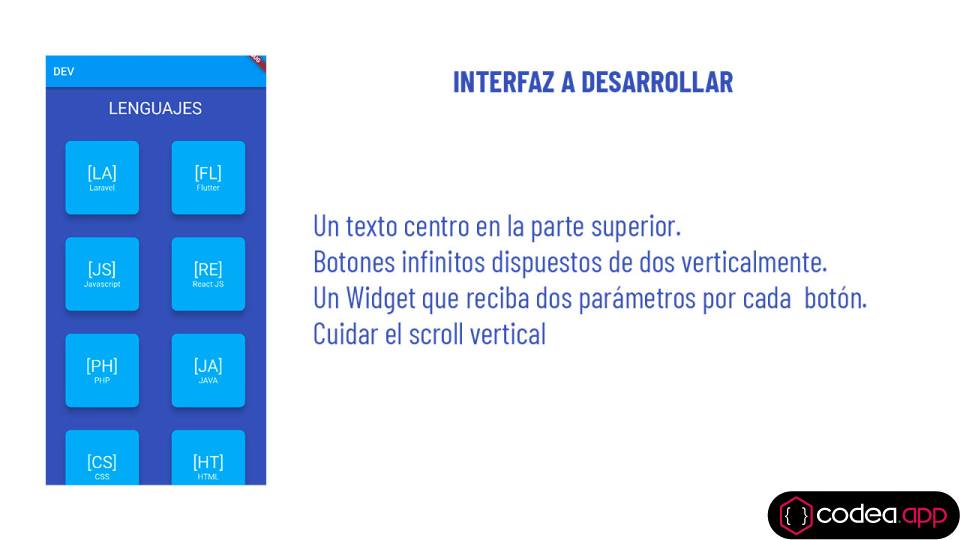
Botones personalizados en Flutter
Al referirnos con botones personalizados, decimos que vamos a programar la interacción con la clase La InkWell esta clase es un área rectangular de un Material widget que responde a los eventos táctiles mostrando un toque recortado, del cual vamos a aprovechar su función onTap() para gestionar la interacción con el usuario.
Para ello vamos a desarrollar un pequeño proyecto. Veamos el diseño que tenemos que implementar:
Paso 1: Creamos el proyecto y lo configuramos
Prácticamente puede quedarnos asi:
import 'package:flutter/material.dart';

void main() {
  runApp(const MyApp());
}

class MyApp extends StatelessWidget {
  const MyApp({super.key});

  // This widget is the root of your application.
  @override
  Widget build(BuildContext context) {
    return MaterialApp(
      title: 'Flutter Demo',
      theme: ThemeData(
        primarySwatch: Colors.blue,
      ),
      home: const MyHomePage(title: 'DEV'),
    );
  }
}
Paso 2: Agregamos SingleChildScrollView()
class MyHomePage extends StatefulWidget {
  const MyHomePage({super.key, required this.title});
  final String title;
  @override
  State<MyHomePage> createState() => _MyHomePageState();
}

class _MyHomePageState extends State<MyHomePage> {
  @override
  Widget build(BuildContext context) {
    return Scaffold(
      appBar: AppBar(
        title: Text(widget.title),
      ),
      backgroundColor: Colors.indigo,
      body: Center(
          child: SingleChildScrollView(
           // codeando
          ),
      ),
    );
  }
}
Paso 3: Agregamos Column()
Column(
              children: <Widget>[
                Row(
                  mainAxisAlignment: MainAxisAlignment.center,
                  children: const [
                    Padding(
                      padding: EdgeInsets.all(20.0),
                      child: Text("LENGUAJES",
                      textAlign: TextAlign.center,
                      style: TextStyle(color: Colors.white, fontSize: 30.0)),
                ),
              ],
            ),
            // ....codeando
          ],
        ),
Paso 4: Agregando Row() para dos botones
Row(
              mainAxisAlignment: MainAxisAlignment.spaceEvenly,
              children: [_boton("Laravel", "[LA]"), _boton("Flutter", "[FL]")],
            ),
Paso 5: Programamos un widget personalizado _boton(nombre,acronimo)
Widget _boton(String nombre, String acronimo) {
  return InkWell(
    child: Container(
      width: 170,
      height: 170,
      child: Card(
          margin: const EdgeInsets.all(20),
          color: Colors.lightBlue,
          shape:
              RoundedRectangleBorder(borderRadius: BorderRadius.circular(10.0)),
          elevation: 10,
          child: Column(
            mainAxisAlignment: MainAxisAlignment.center,
            children: [
              Text(
                acronimo,
                style: const TextStyle(color: Colors.white, fontSize: 30.0),
              ),
              Text(
                nombre,
                style: const TextStyle(color: Colors.white),
              )
            ],
          )),
    ),
    onTap: () {
      print("ok");
    },
  );
}
Paso 6: Testing
Código complejo del menu de opciones Flutter
import 'package:flutter/material.dart';

void main() {
  runApp(const MyApp());
}

class MyApp extends StatelessWidget {
  const MyApp({super.key});

  // This widget is the root of your application.
  @override
  Widget build(BuildContext context) {
    return MaterialApp(
      title: 'Flutter Demo',
      theme: ThemeData(
        primarySwatch: Colors.blue,
      ),
      home: const MyHomePage(title: 'DEV'),
    );
  }
}

class MyHomePage extends StatefulWidget {
  const MyHomePage({super.key, required this.title});
  final String title;
  @override
  State<MyHomePage> createState() => _MyHomePageState();
}

class _MyHomePageState extends State<MyHomePage> {
  @override
  Widget build(BuildContext context) {
    return Scaffold(
      appBar: AppBar(
        title: Text(widget.title),
      ),
      backgroundColor: Colors.indigo,
      body: Center(
          child: SingleChildScrollView(
            child: Column(
              children: <Widget>[
                Row(
                  mainAxisAlignment: MainAxisAlignment.center,
                  children: const [
                    Padding(
                      padding: EdgeInsets.all(20.0),
                      child: Text("LENGUAJES",
                      textAlign: TextAlign.center,
                      style: TextStyle(color: Colors.white, fontSize: 30.0)),
                ),
              ],
            ),
            Row(
              mainAxisAlignment: MainAxisAlignment.spaceEvenly,
              children: [_boton("Laravel", "[LA]"), _boton("Flutter", "[FL]")],
            ),
            Row(
              mainAxisAlignment: MainAxisAlignment.spaceEvenly,
              children: [
                _boton("Javascript", "[JS]"),
                _boton("React JS", "[RE]")
              ],
            ),
            Row(
              mainAxisAlignment: MainAxisAlignment.spaceEvenly,
              children: [_boton("PHP", "[PH]"), _boton("JAVA", "[JA]")],
            ),
            Row(
              mainAxisAlignment: MainAxisAlignment.spaceEvenly,
              children: [_boton("CSS", "[CS]"), _boton("HTML", "[HT]")],
            ),
            Row(
              mainAxisAlignment: MainAxisAlignment.spaceEvenly,
              children: [_boton("Android", "[AN]"), _boton("Json", "[JN]")],
            )
          ],
        ),
      ),
      ),
    );
  }
}

Widget _boton(String nombre, String acronimo) {
  return InkWell(
    child: Container(
      width: 170,
      height: 170,
      child: Card(
          margin: const EdgeInsets.all(20),
          color: Colors.lightBlue,
          shape:
              RoundedRectangleBorder(borderRadius: BorderRadius.circular(10.0)),
          elevation: 10,
          child: Column(
            mainAxisAlignment: MainAxisAlignment.center,
            children: [
              Text(
                acronimo,
                style: const TextStyle(color: Colors.white, fontSize: 30.0),
              ),
              Text(
                nombre,
                style: const TextStyle(color: Colors.white),
              )
            ],
          )),
    ),
    onTap: () {
      print("ok");
    },
  );
}
Hasta un próximo video!!.
botones en flutter con inkwell
botones en flutter con inkwell
Leido 34204 veces | 6 usuarios
Botones en Flutter
Accede al código fuente esencial de nuestra aplicación en formato ZIP ó TXT. Ideal para desarrolladores que desean personalizar o integrar nuestra solución.
- [ Descargas: 24 ]
CÓDIGO FUENTE: USD 0.00
Conversar con J.Luis